Why OAuth for Next.js?
OAuth 2.0 (often with OpenID Connect) lets users sign in with providers like Google, GitHub, Microsoft, Apple, etc. Benefits:
- Faster onboarding (no passwords to store)
- Better security (MFA, risk signals from the provider)
- Less liability (you don’t handle passwords)
- Works across web, mobile, and APIs
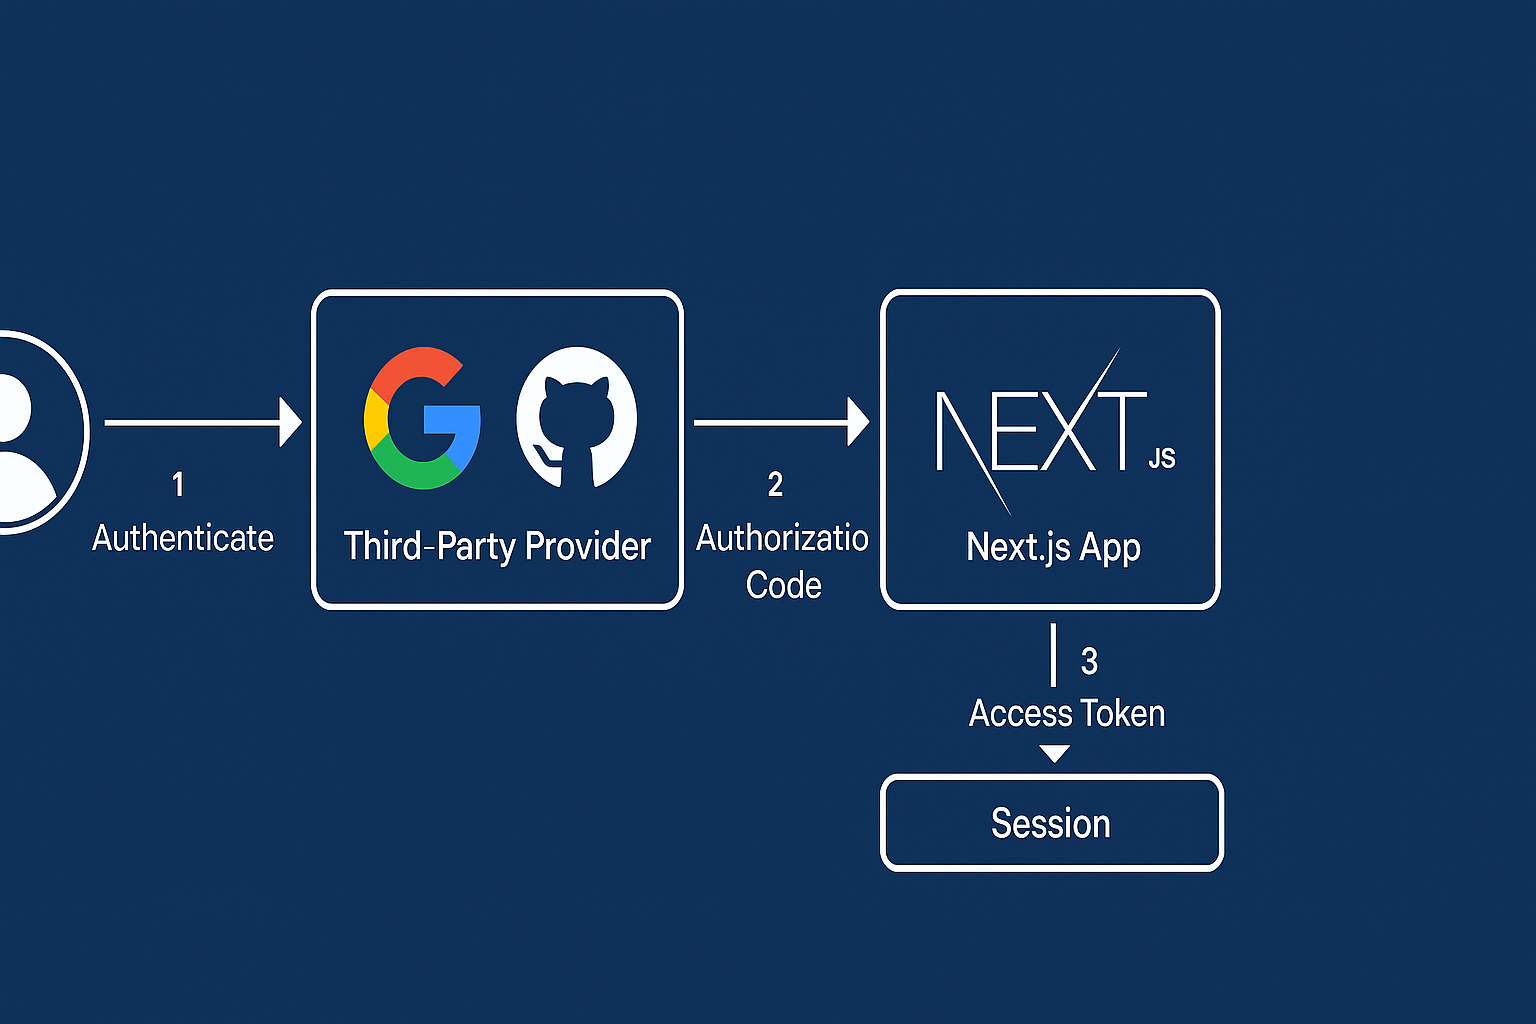
In browser-based Next.js apps, the Authorization Code + PKCE flow is the secure default.
Architecture at a Glance
- Next.js App Router (server components + Route Handlers)
- Auth.js (NextAuth) handles OAuth/OIDC flows, sessions, callbacks
- Session strategy: JWT (no DB) or DB-backed via Prisma Adapter
- Protected routes: Middleware +
auth()server helper - API protection: Verify session in Route Handlers
Step 1: Install Auth.js (NextAuth) and peers
npm i next-auth
# If you’ll persist users/profiles:
npm i @prisma/client prisma
Initialize Prisma only if you want a database:
npx prisma init
Step 2: Create OAuth credentials
Create OAuth apps on the provider(s):
- Google: Console → Credentials → OAuth 2.0 Client ID
- Authorized redirect URI:
https://your-domain.com/api/auth/callback/google
- Authorized redirect URI:
- GitHub: Settings → Developer settings → OAuth Apps
- Callback URL:
https://your-domain.com/api/auth/callback/github
- Callback URL:
For local dev, use http://localhost:3000 instead of your domain.
Keep Client ID and Client Secret handy.
Step 3: Configure environment variables
.env.local:
NEXTAUTH_URL=http://localhost:3000
NEXTAUTH_SECRET=replace_with_a_long_random_string

# Google
GOOGLE_CLIENT_ID=your_google_client_id
GOOGLE_CLIENT_SECRET=your_google_client_secret

# GitHub
GITHUB_ID=your_github_client_id
GITHUB_SECRET=your_github_client_secret
Generate a strong NEXTAUTH_SECRET (e.g., openssl rand -base64 32).
Step 4: Add Auth.js Route Handler (App Router)
File: app/api/auth/[...nextauth]/route.ts
import NextAuth from "next-auth";
import Google from "next-auth/providers/google";
import GitHub from "next-auth/providers/github";
import type { NextAuthConfig } from "next-auth";

export const authConfig: NextAuthConfig = {
  session: { strategy: "jwt", maxAge: 60 * 60 * 24 * 7 }, // 7 days
  providers: [
    Google({
      clientId: process.env.GOOGLE_CLIENT_ID!,
      clientSecret: process.env.GOOGLE_CLIENT_SECRET!,
      // PKCE is used automatically for OAuth 2.0 providers
    }),
    GitHub({
      clientId: process.env.GITHUB_ID!,
      clientSecret: process.env.GITHUB_SECRET!,
    }),
  ],
  callbacks: {
    async jwt({ token, account, profile }) {
      // First login → persist provider data on the token
      if (account?.provider) {
        token.provider = account.provider;
      }
      // Optionally map profile fields
      if (profile && "email" in profile) token.email = String(profile.email);
      return token;
    },
    async session({ session, token }) {
      // Expose selected token fields to the client session
      session.user.provider = token.provider as string | undefined;
      return session;
    },
  },
  // optional: custom pages
  pages: { signIn: "/login" },
};

const handler = NextAuth(authConfig);
export { handler as GET, handler as POST };
Step 5: Auth helpers & route protection
Auth.js provides a server helper you can use anywhere on the server.
lib/auth.ts (optional convenience):
import { auth } from "next-auth";
export { auth }; // re-export so you can `import { auth } from "@/lib/auth"`
Protect pages (Server Components)
// app/dashboard/page.tsx
import { redirect } from "next/navigation";
import { auth } from "next-auth";

export default async function DashboardPage() {
  const session = await auth();
  if (!session) redirect("/login");
  return <div>Welcome, {session.user?.email}</div>;
}
Protect API routes (Route Handlers)
// app/api/private/route.ts
import { NextResponse } from "next/server";
import { auth } from "next-auth";

export async function GET() {
  const session = await auth();
  if (!session) return NextResponse.json({ error: "Unauthorized" }, { status: 401 });
  return NextResponse.json({ ok: true, email: session.user?.email });
}
Global guard with middleware (optional)
// middleware.ts
import { withAuth } from "next-auth/middleware";

export default withAuth({
  pages: { signIn: "/login" },
});

export const config = {
  matcher: ["/dashboard/:path*", "/api/private/:path*"], // protected paths
};
Step 6: UI – login/logout buttons
// app/login/page.tsx
"use client";
import { signIn } from "next-auth/react";

export default function Login() {
  return (
    <main className="grid gap-3 p-8">
      <button onClick={() => signIn("google")}>Sign in with Google</button>
      <button onClick={() => signIn("github")}>Sign in with GitHub</button>
    </main>
  );
}
// app/components/UserMenu.tsx
"use client";
import { signOut, useSession } from "next-auth/react";

export function UserMenu() {
  const { data } = useSession();
  return data ? (
    <div>
      <span>{data.user?.email}</span>
      <button onClick={() => signOut()}>Sign out</button>
    </div>
  ) : null;
}
Wrap your app with the provider:
// app/providers.tsx
"use client";
import { SessionProvider } from "next-auth/react";

export default function Providers({ children }: { children: React.ReactNode }) {
  return <SessionProvider>{children}</SessionProvider>;
}
And include it in app/layout.tsx:
import Providers from "./providers";
export default function RootLayout({ children }: { children: React.ReactNode }) {
  return (
    <html lang="en">
      <body><Providers>{children}</Providers></body>
    </html>
  );
}
Optional: Persist users with Prisma (Adapter)
npm i @auth/prisma-adapter
authConfig:
import { PrismaAdapter } from "@auth/prisma-adapter";
import { prisma } from "@/lib/prisma";

export const authConfig = {
  adapter: PrismaAdapter(prisma),
  session: { strategy: "database" }, // or still JWT if you prefer
  // ...providers, callbacks
} satisfies NextAuthConfig;
Run the Auth.js Prisma schema or merge models into yours, then prisma migrate.
Security Best Practices
- Use PKCE (Auth.js does this for you with OAuth 2.0 providers).
- Set
NEXTAUTH_URLcorrectly for each environment; use HTTPS in prod. - Store secrets only in server env vars; never expose client secrets to the browser.
- Short session/JWT lifetimes; rotate
NEXTAUTH_SECRETif compromised. - Limit scopes to what you need (e.g.,
openid email profile). - CSRF is built-in; don’t disable it unless you know why.
- Strict cookies: Auth.js sets
HttpOnly,Secure,SameSite—keep them. - Role-based access: add
roleto the token injwtcallback and gate routes. - Logouts: consider provider revocation for sensitive apps.
Common Troubleshooting
- Callback URL mismatch: Ensure provider settings exactly match
/api/auth/callback/{provider}. - Wrong domain in production: Set
NEXTAUTH_URLtohttps://your-domain.com. - CORS issues on API routes: Prefer same-origin calls to your own
/api/*. If calling external APIs, include the bearer from the session on the server (not client). - Server Actions: Use
const session = await auth()inside Server Actions for user context.
When to Consider a Hosted IdP
For enterprise SSO, audit logs, multi-tenant orgs, or passwordless/MFA policies, consider Auth0, Okta, Cognito, WorkOS, Stytch, etc. Auth.js integrates with most OIDC-compatible IdPs.
Conclusion
With Auth.js (NextAuth) and the App Router, adding secure OAuth to your Next.js app is straightforward:
- Create provider credentials
- Configure Route Handler with providers
- Protect pages/APIs using
auth()or middleware - Follow security best practices